Expose Localhost to Internet: Cloudflare Tunnel Alternative to ngrok
Need to share your local development site with a client? Testing webhooks that require a public URL? You've probably used ngrok—and paid their monthly fees for basic features like custom domains.
There's a free, better alternative. Cloudflare Tunnel (formerly Argo Tunnel) offers:
- ✅ Free custom domains
- ✅ Permanent URLs (not random strings)
- ✅ No bandwidth limits
- ✅ One-click setup in FlyEnv—no command line needed
Why Developers Are Switching from ngrok
| Feature | ngrok Free | ngrok Pro ($8/mo) | Cloudflare Tunnel |
|---|---|---|---|
| Custom domains | ❌ | ✅ | ✅ FREE |
| Permanent URLs | ❌ | ✅ | ✅ FREE |
| HTTP/2 support | ✅ | ✅ | ✅ FREE |
| Bandwidth limits | 1GB/month | Unlimited | Unlimited FREE |
| Authentication | ❌ | ✅ | ✅ FREE |
| Setup complexity | Simple | Simple | One-click in FlyEnv |
Annual savings: $96+ per developer
FlyEnv One-Click Setup (Recommended)
FlyEnv integrates Cloudflare Tunnel directly into the UI. No terminal commands, no configuration files—just point, click, and share.
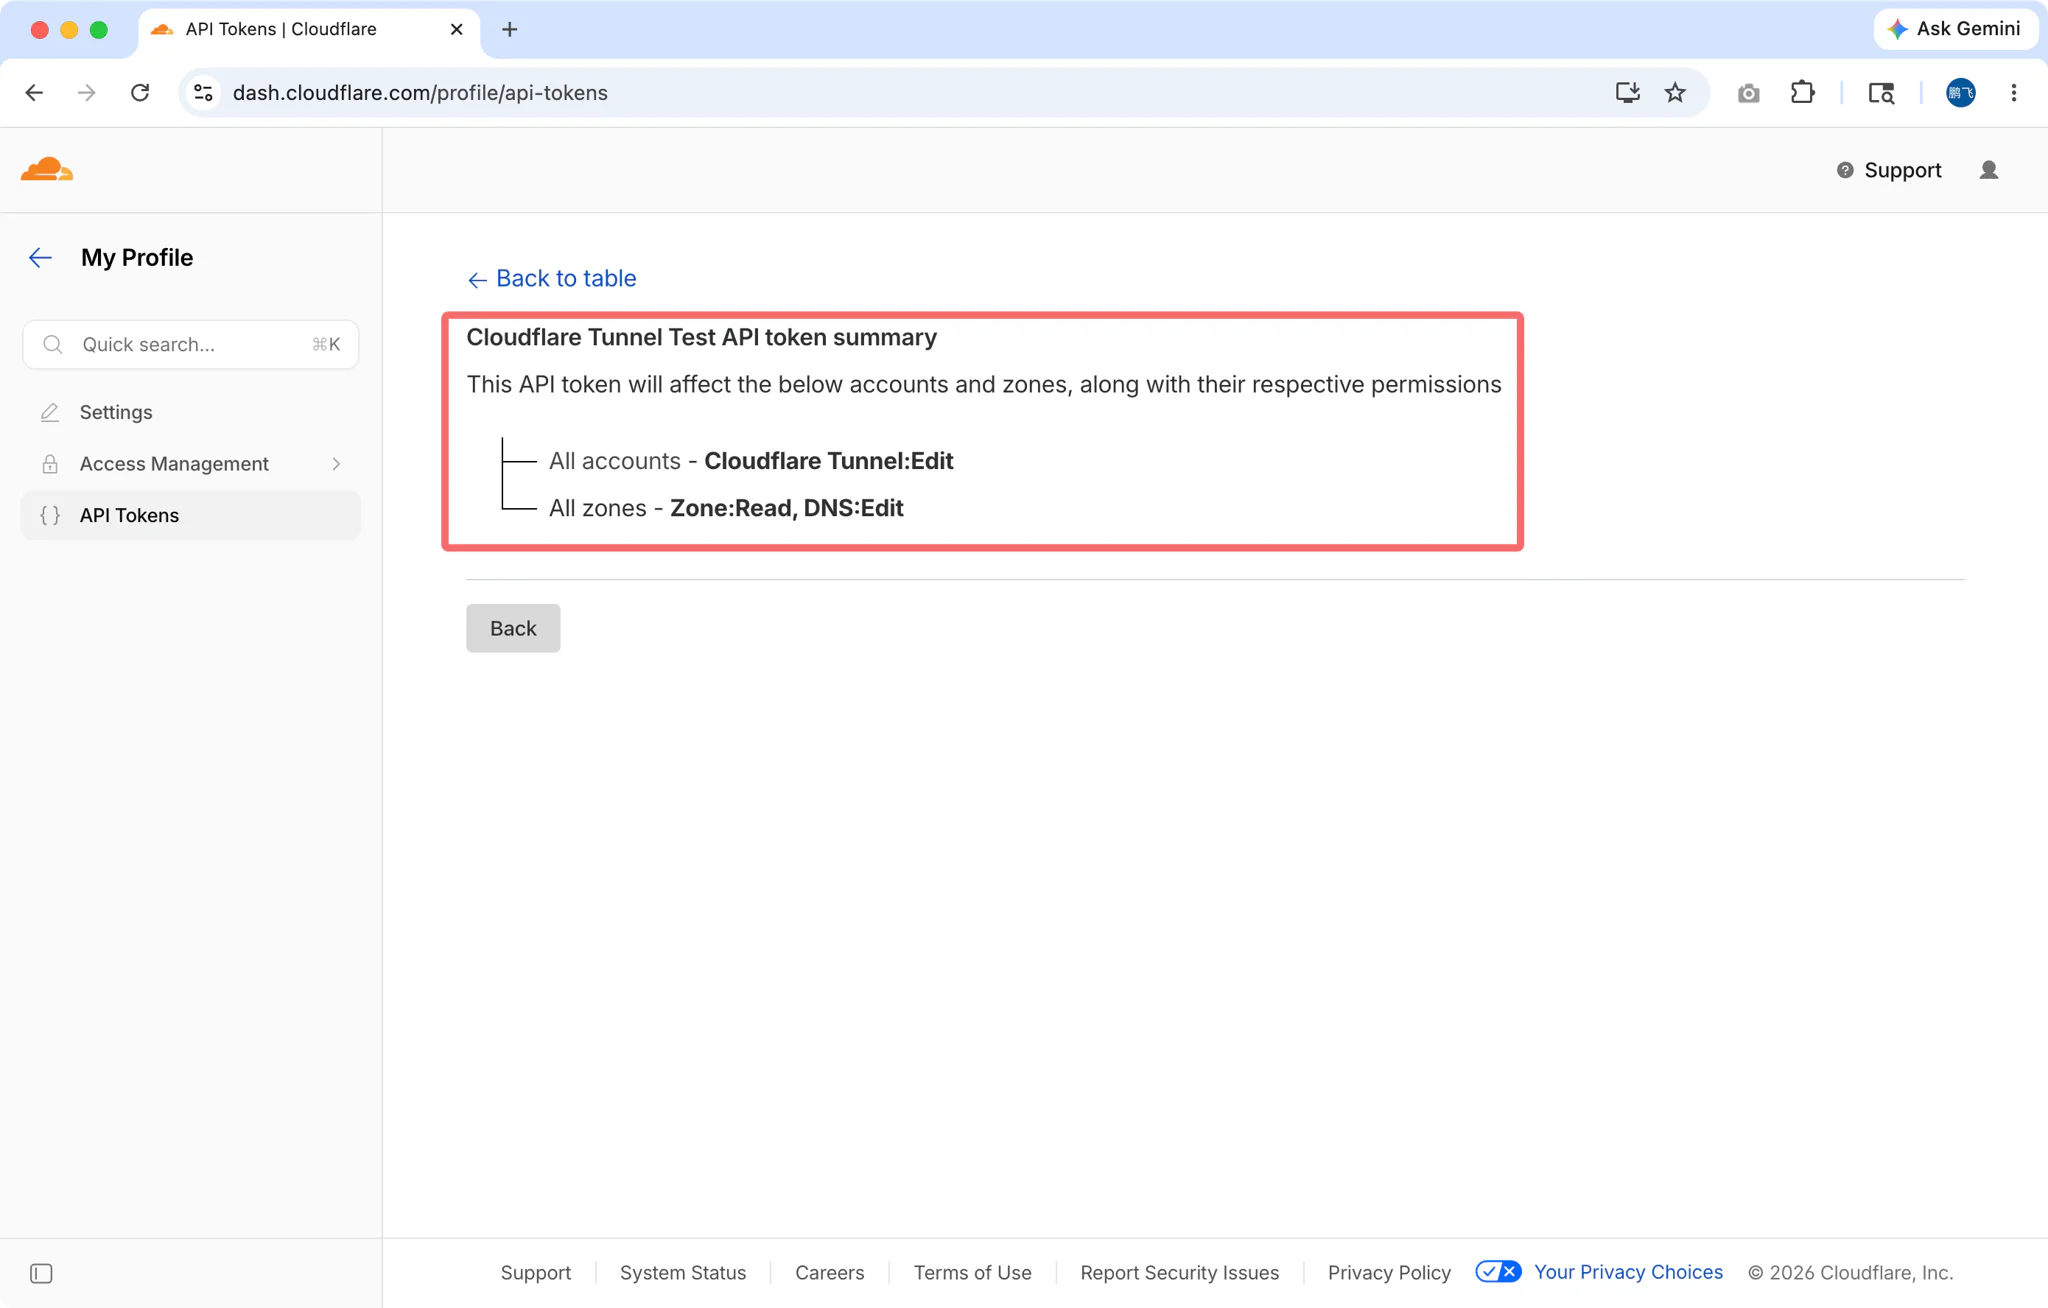
Step 1: Get Your Cloudflare API Token
- Log in to Cloudflare Dashboard
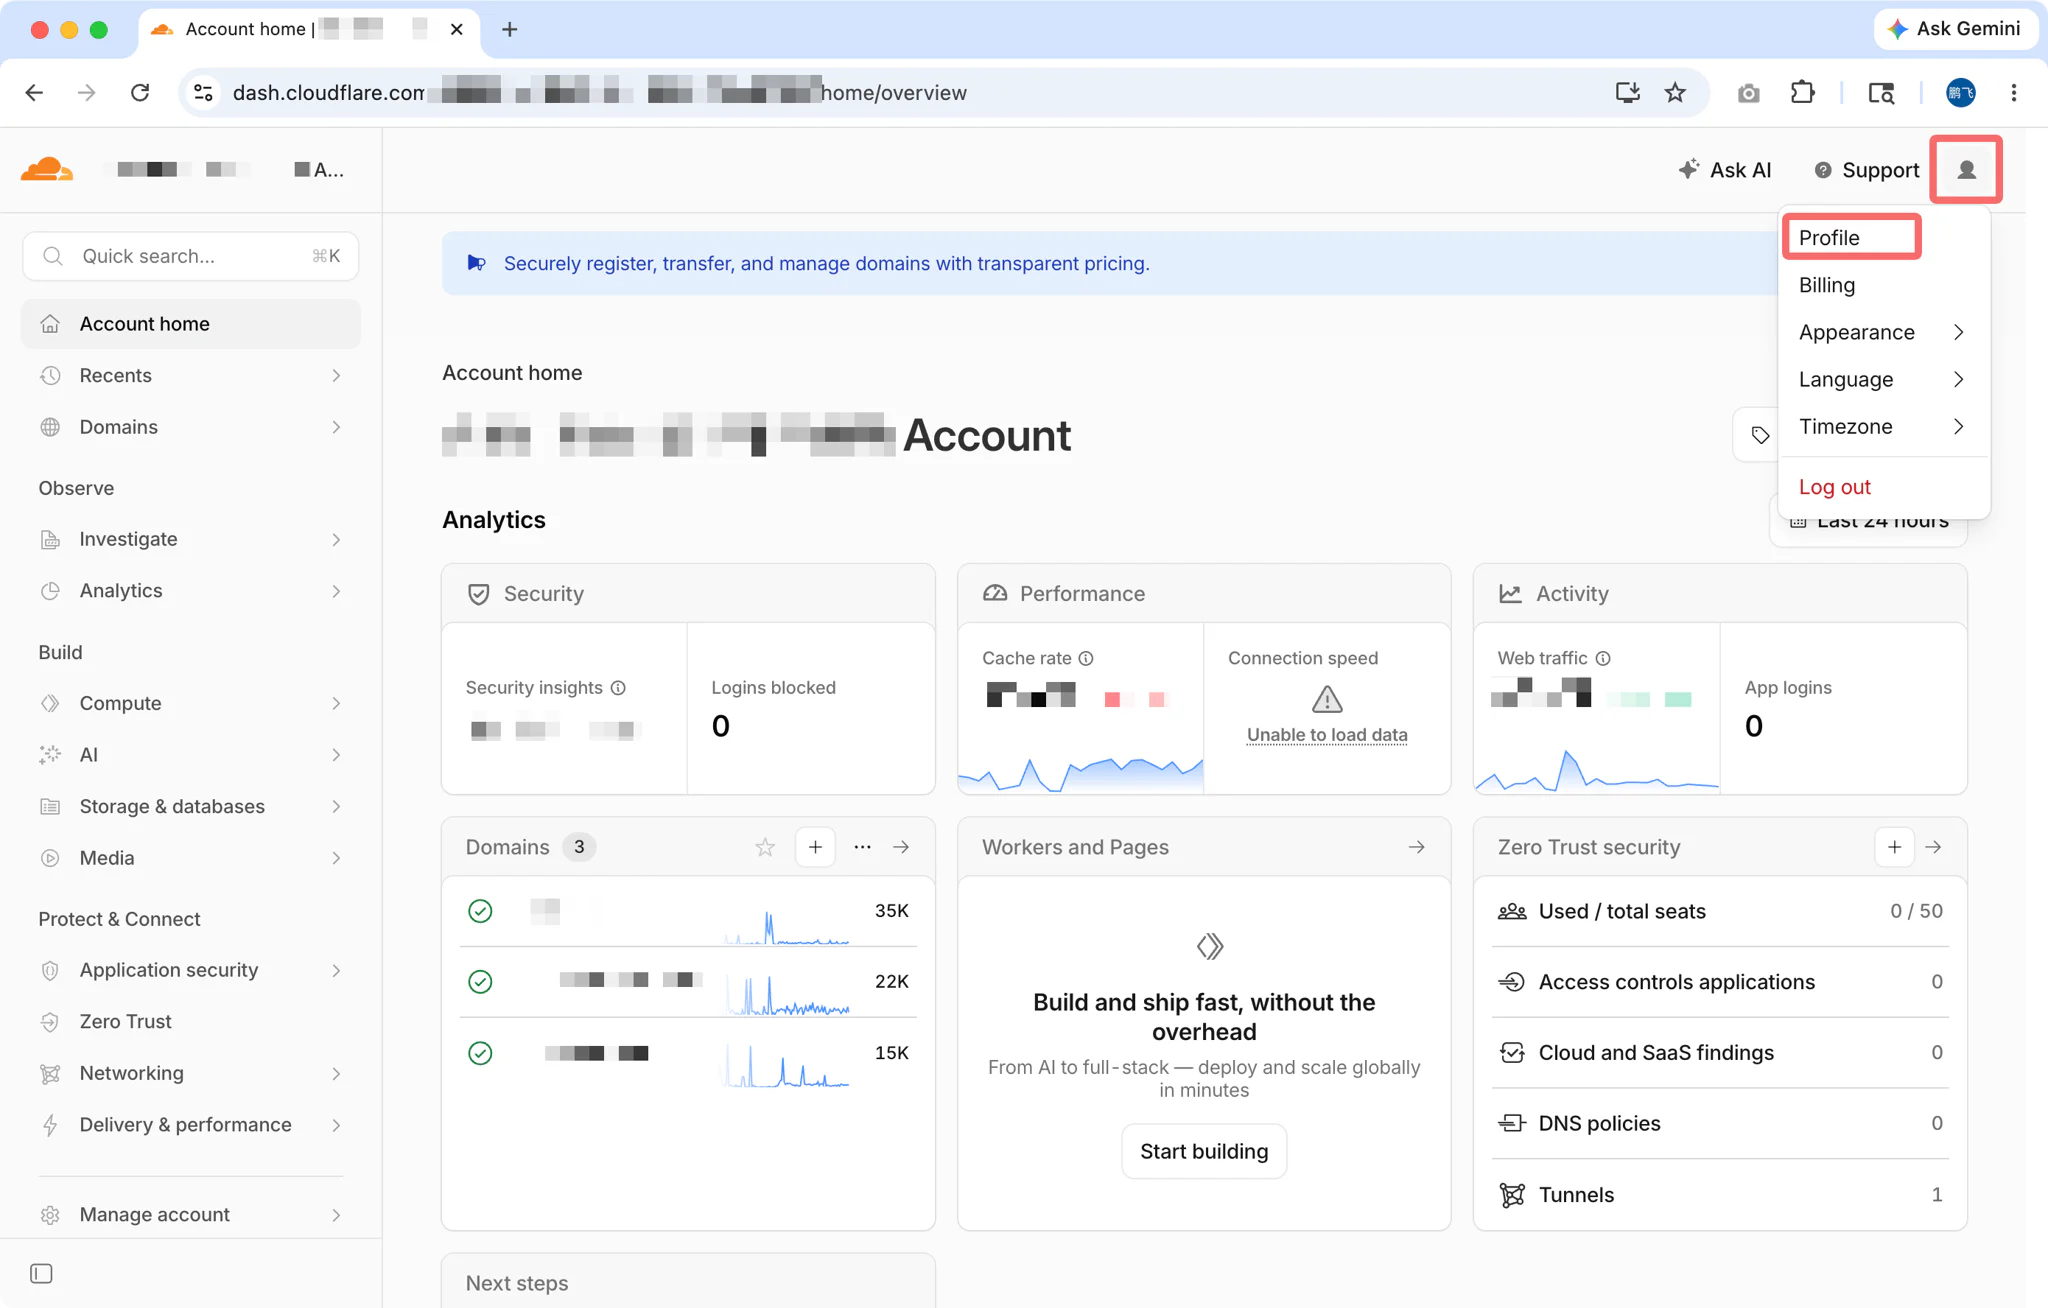
- Go to My Profile (top right) → API Tokens
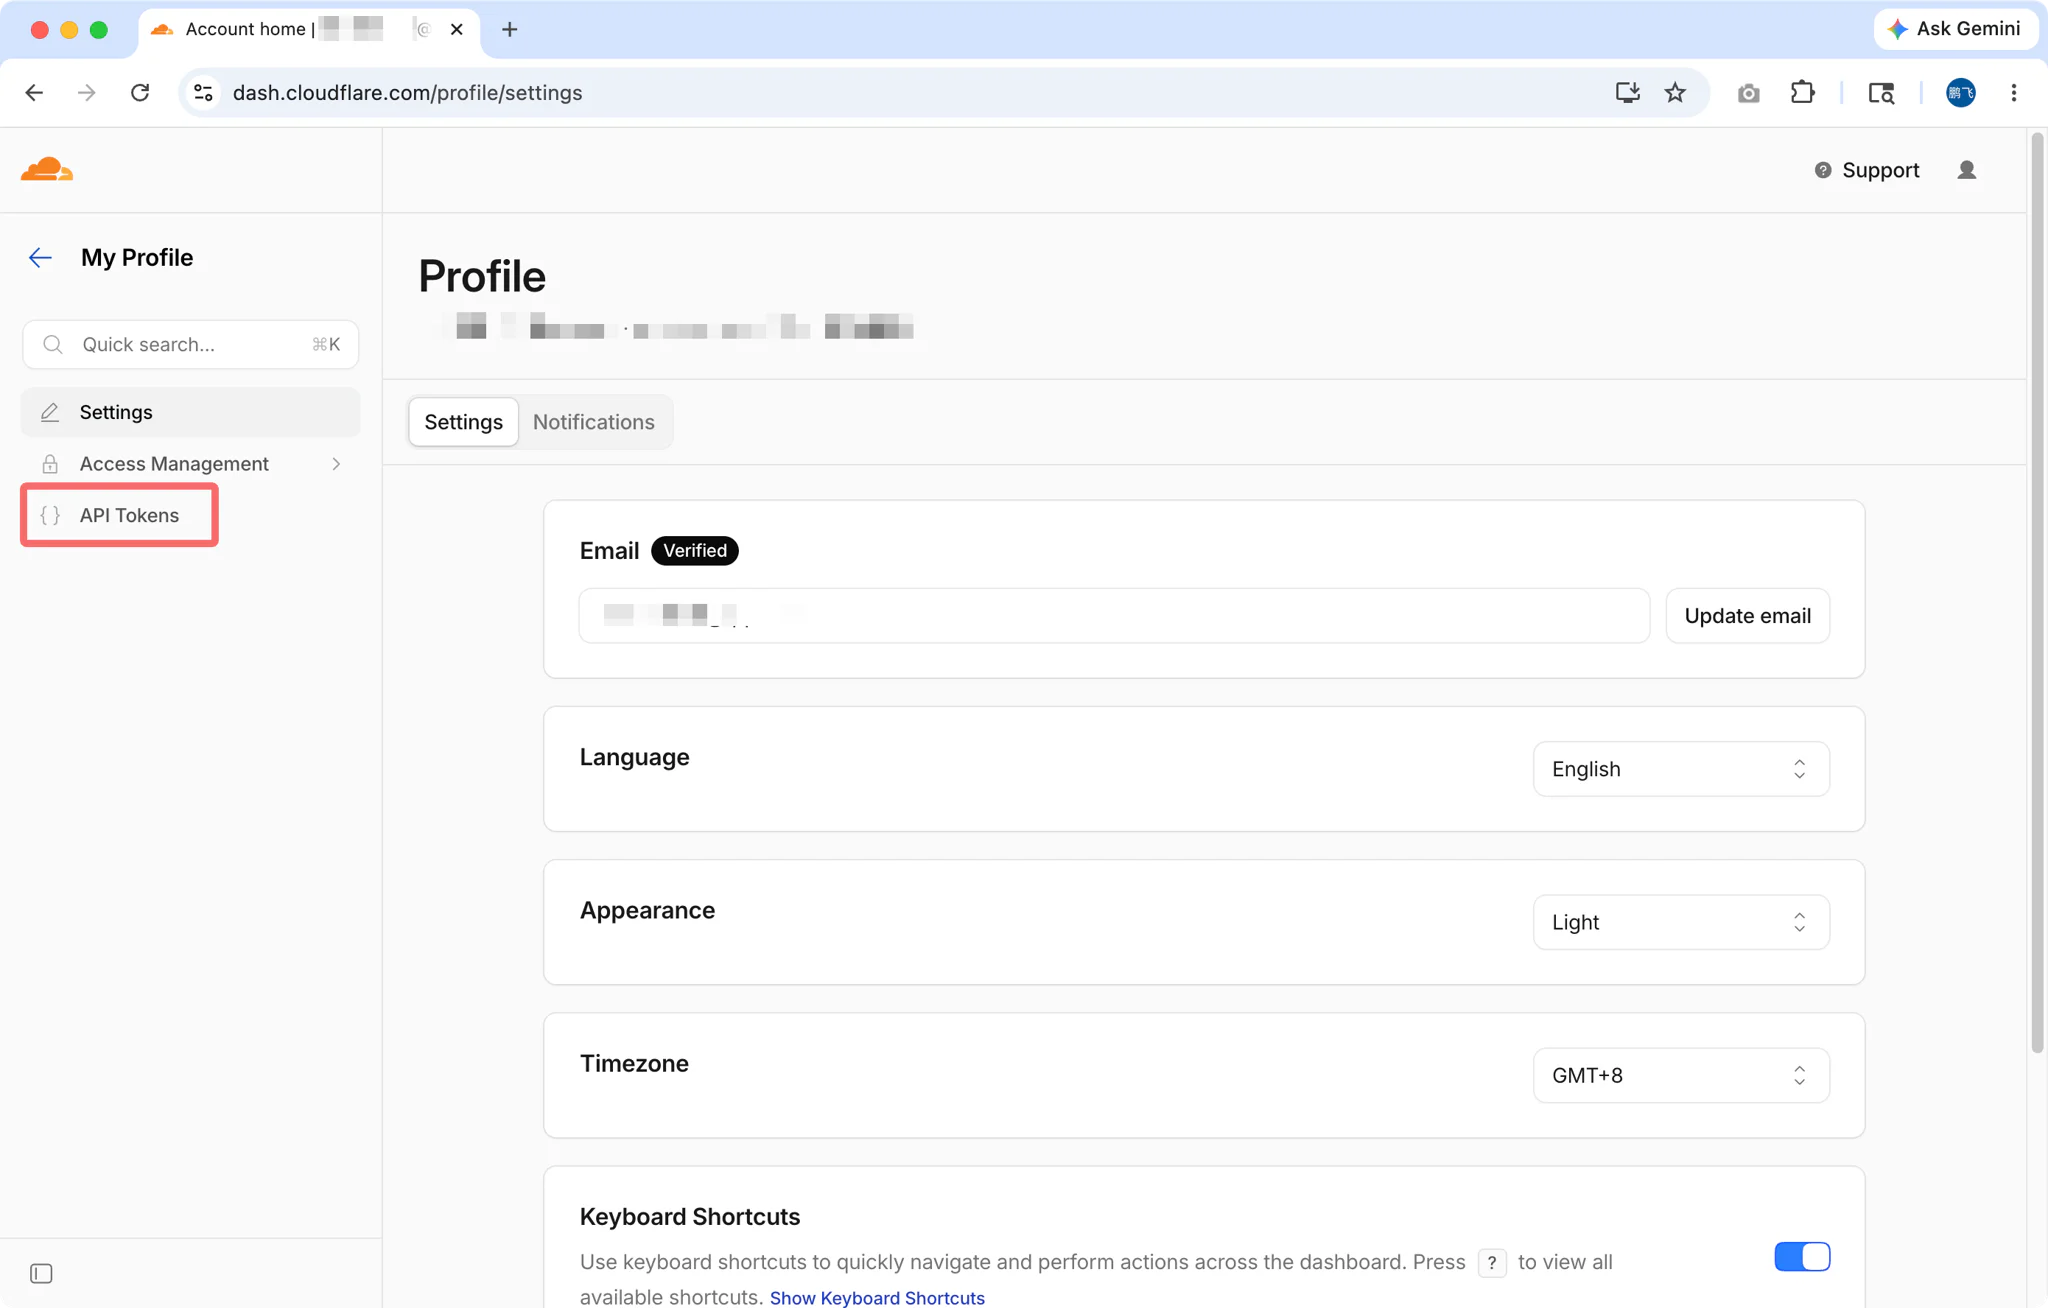
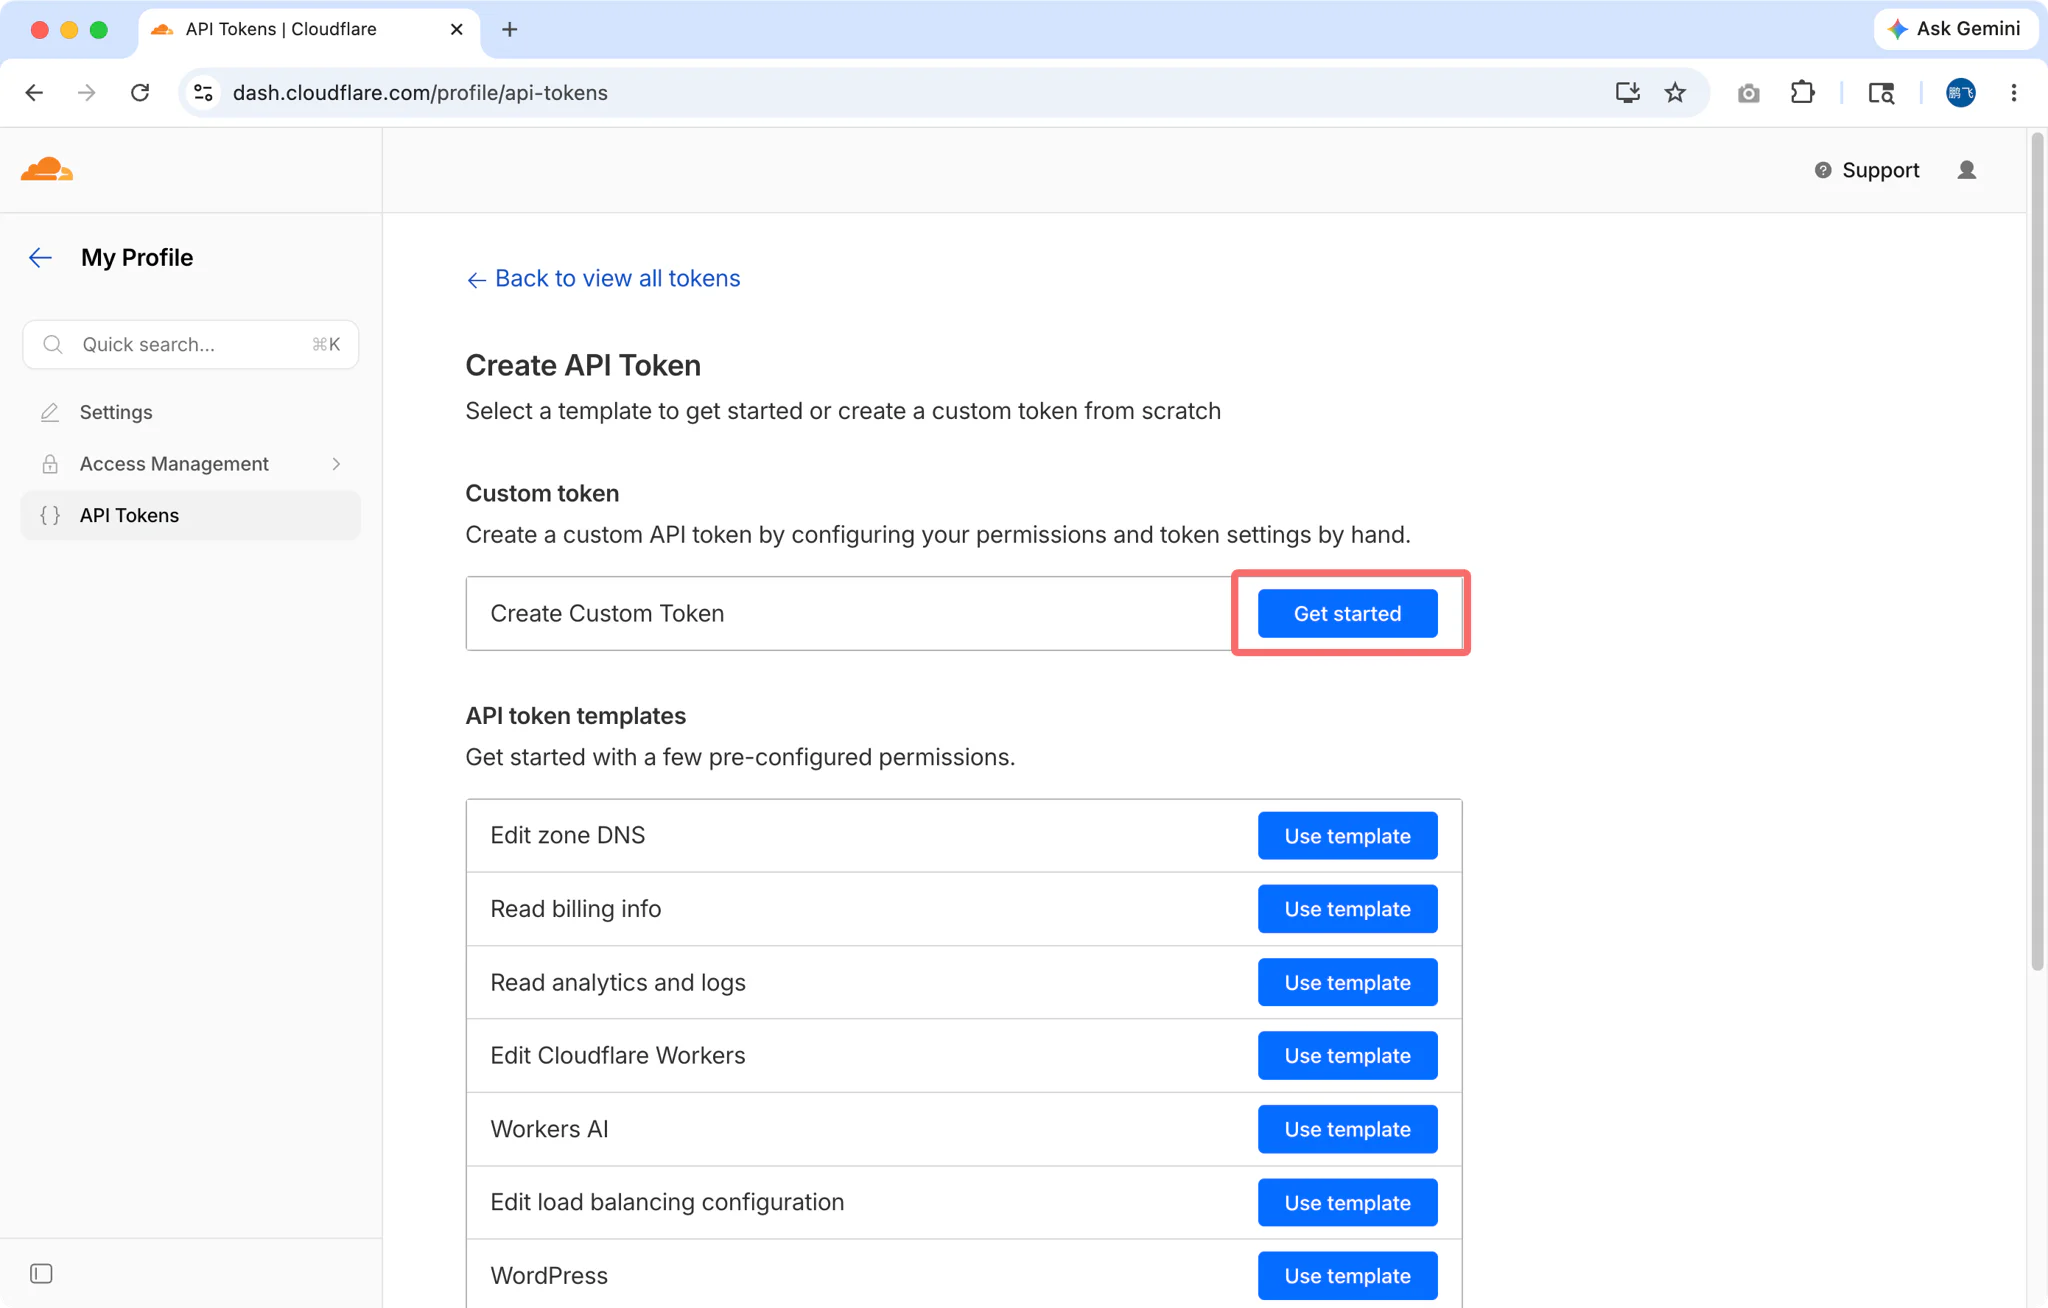
- Click Create Token
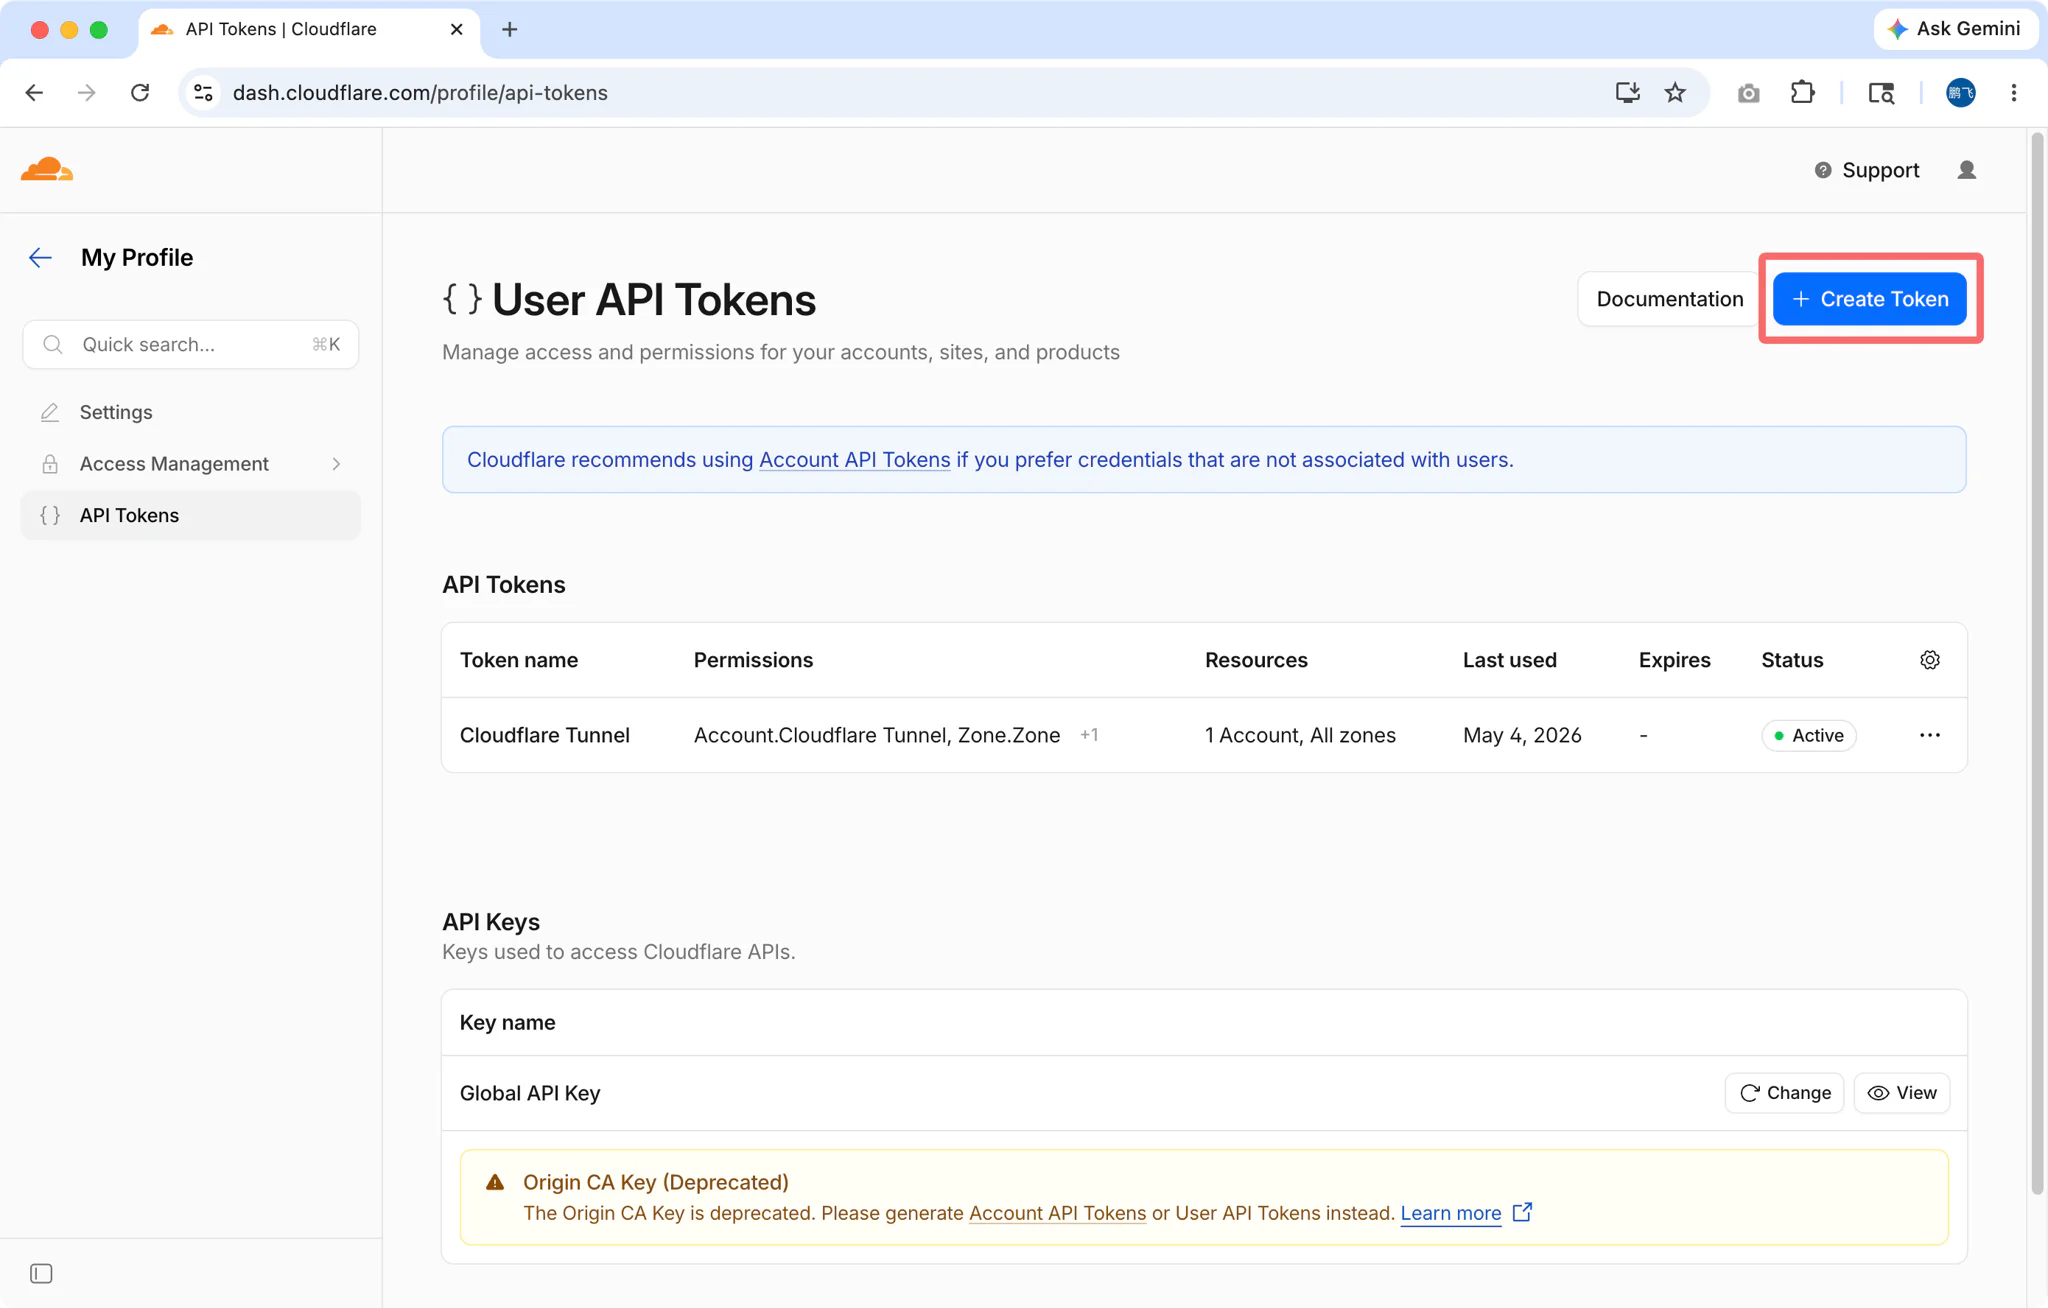
Use the "Cloudflare Tunnel" template, or create custom with these permissions:
- Account:Cloudflare Tunnel:Edit — For managing tunnels
- Zone:Zone:Read — For listing your domains
- Zone:DNS:Edit — For creating DNS records
Select the Zone Resources (domains) you want to use
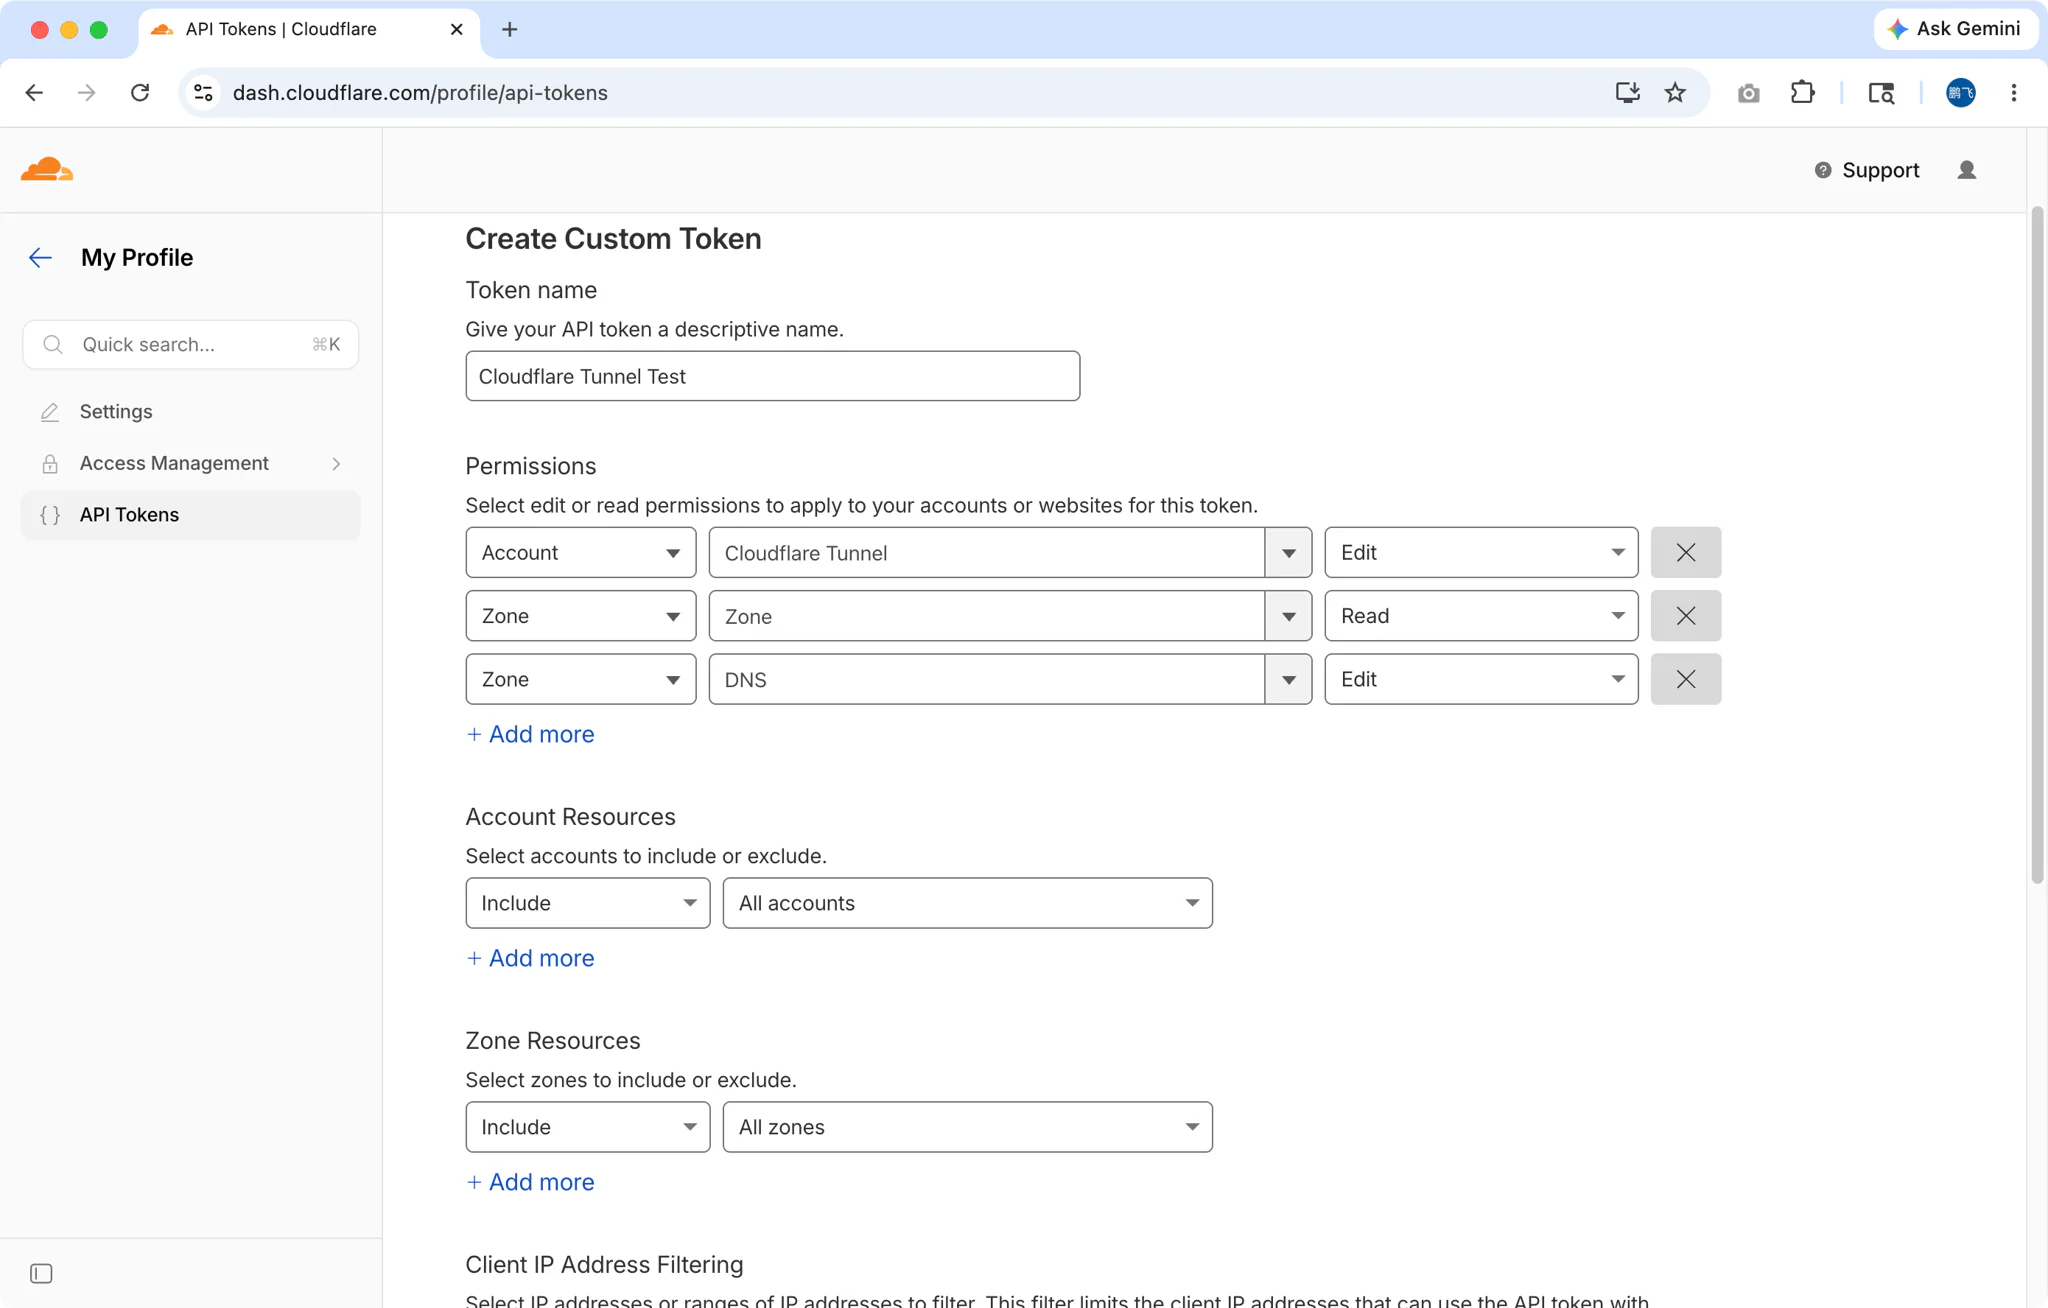
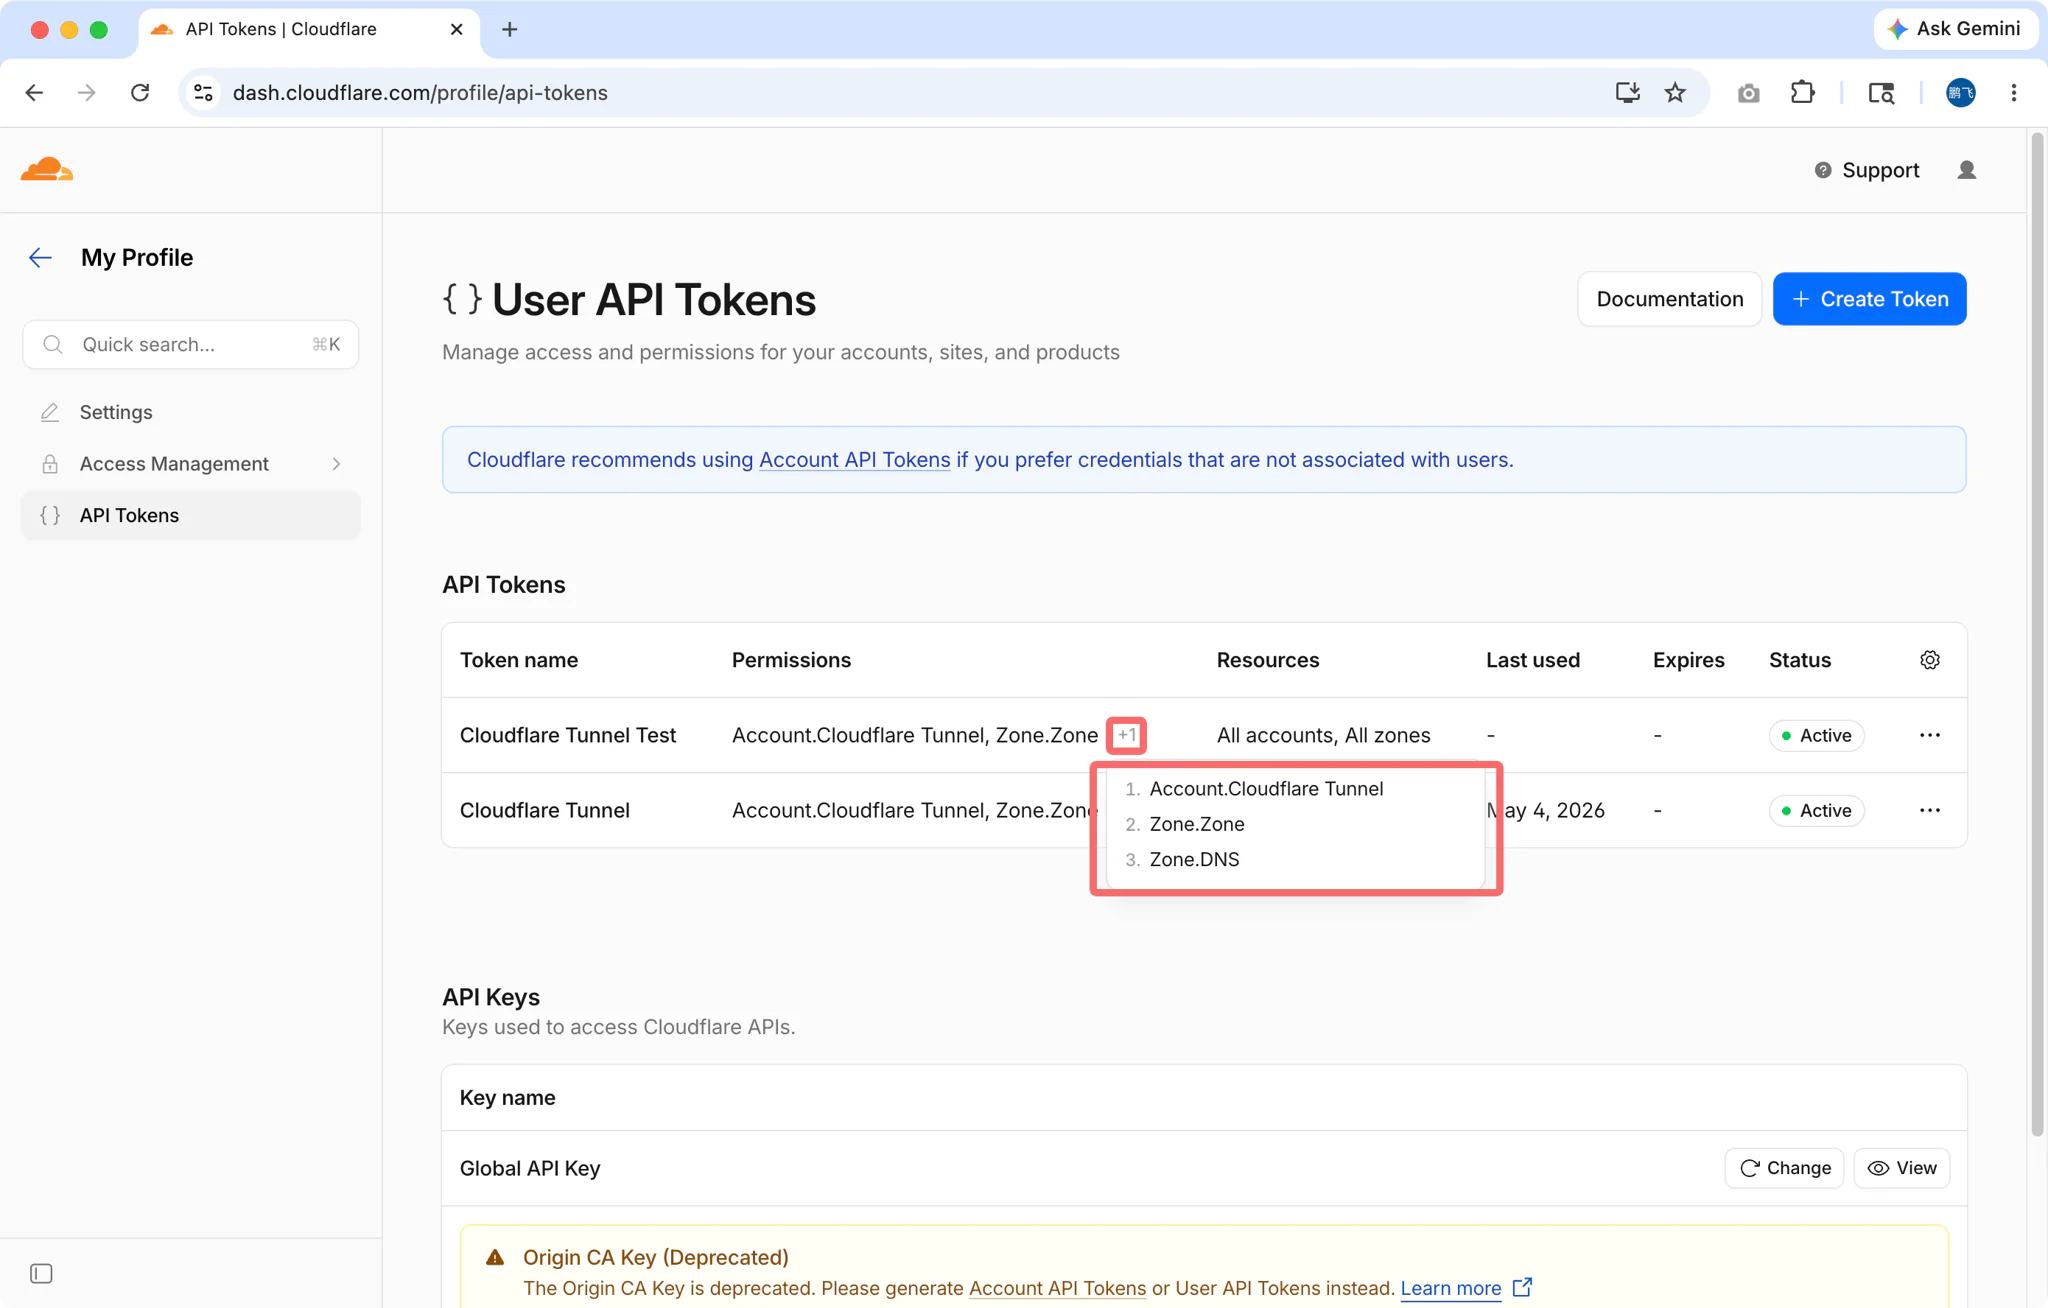
- Copy the generated token
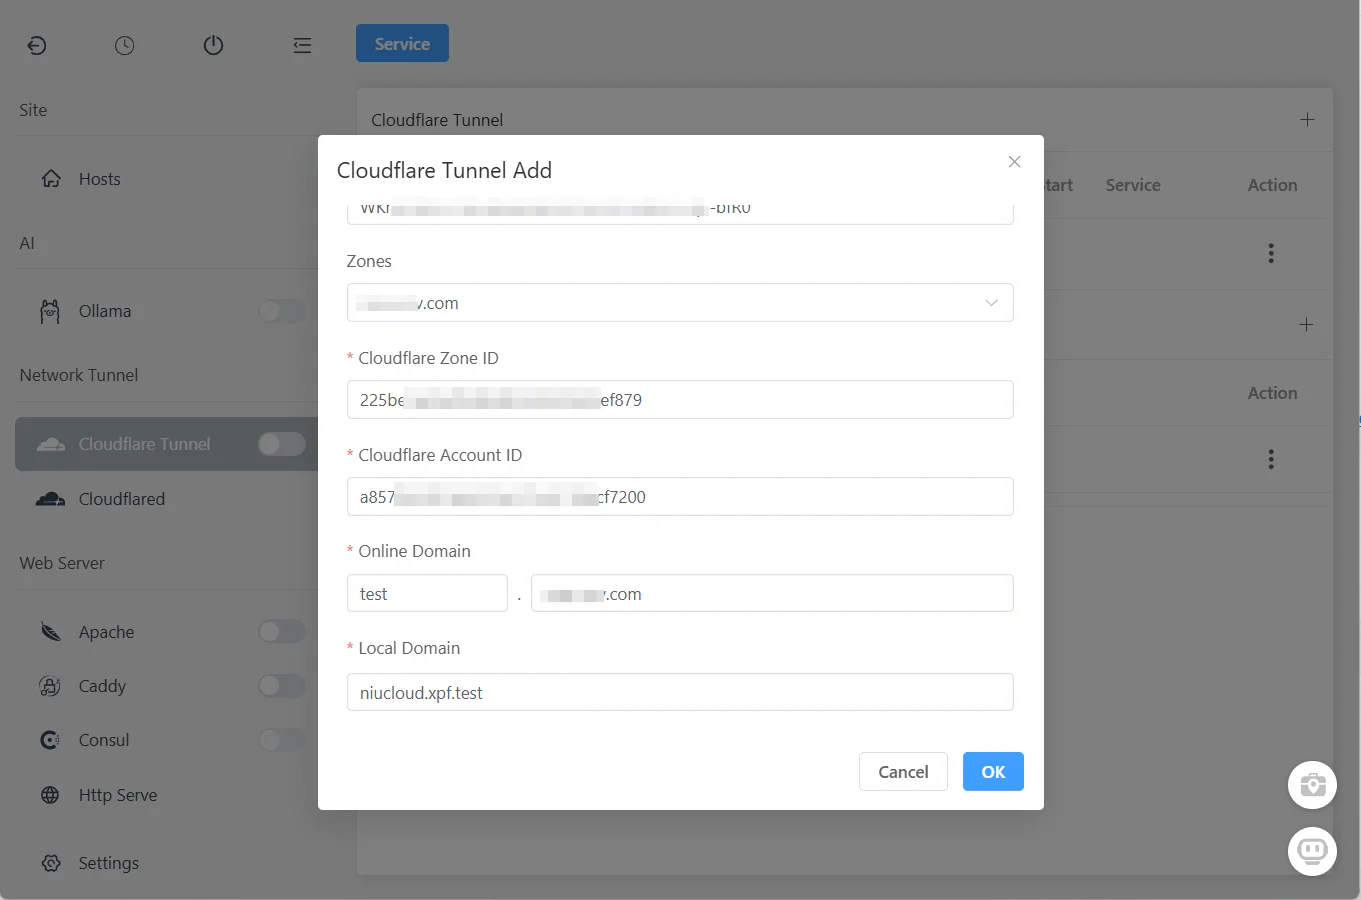
Step 2: Configure in FlyEnv
- Open FlyEnv → Cloudflare Tunnel module, and click Plus Icon Button
- Paste your API Token
- FlyEnv automatically fetches your available domains
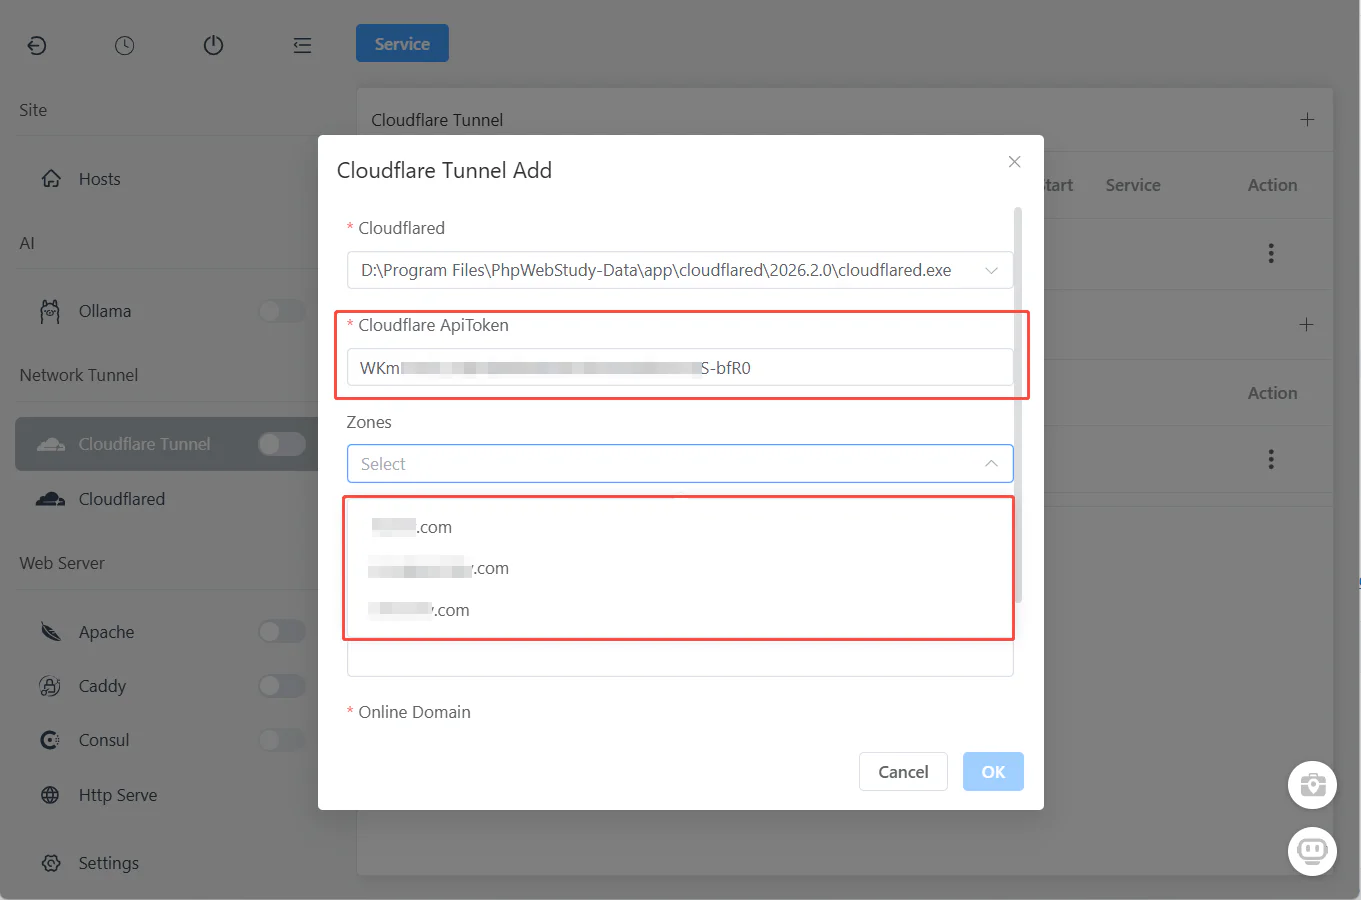
Step 3: Create Your Tunnel
After zones are loaded:
- Select Zone: Choose the domain you want to use (e.g.,
yourdomain.com) - Set Subdomain: Enter your desired subdomain (e.g.,
dev→ createsdev.yourdomain.com) - Set Local URL: Choose your local development URL (e.g.,
http://localhost:3000orhttps://myproject.test) - Click "Ok"
That's it! FlyEnv handles everything internally:
- ✅ Creates the Cloudflare Tunnel
- ✅ Configures DNS records
- ✅ Sets up routing rules
- ✅ Generates SSL certificates
Step 4: Start the Tunnel
Click the "Start" button in the Cloudflare Tunnel module.
Your local site is now live at https://dev.yourdomain.com
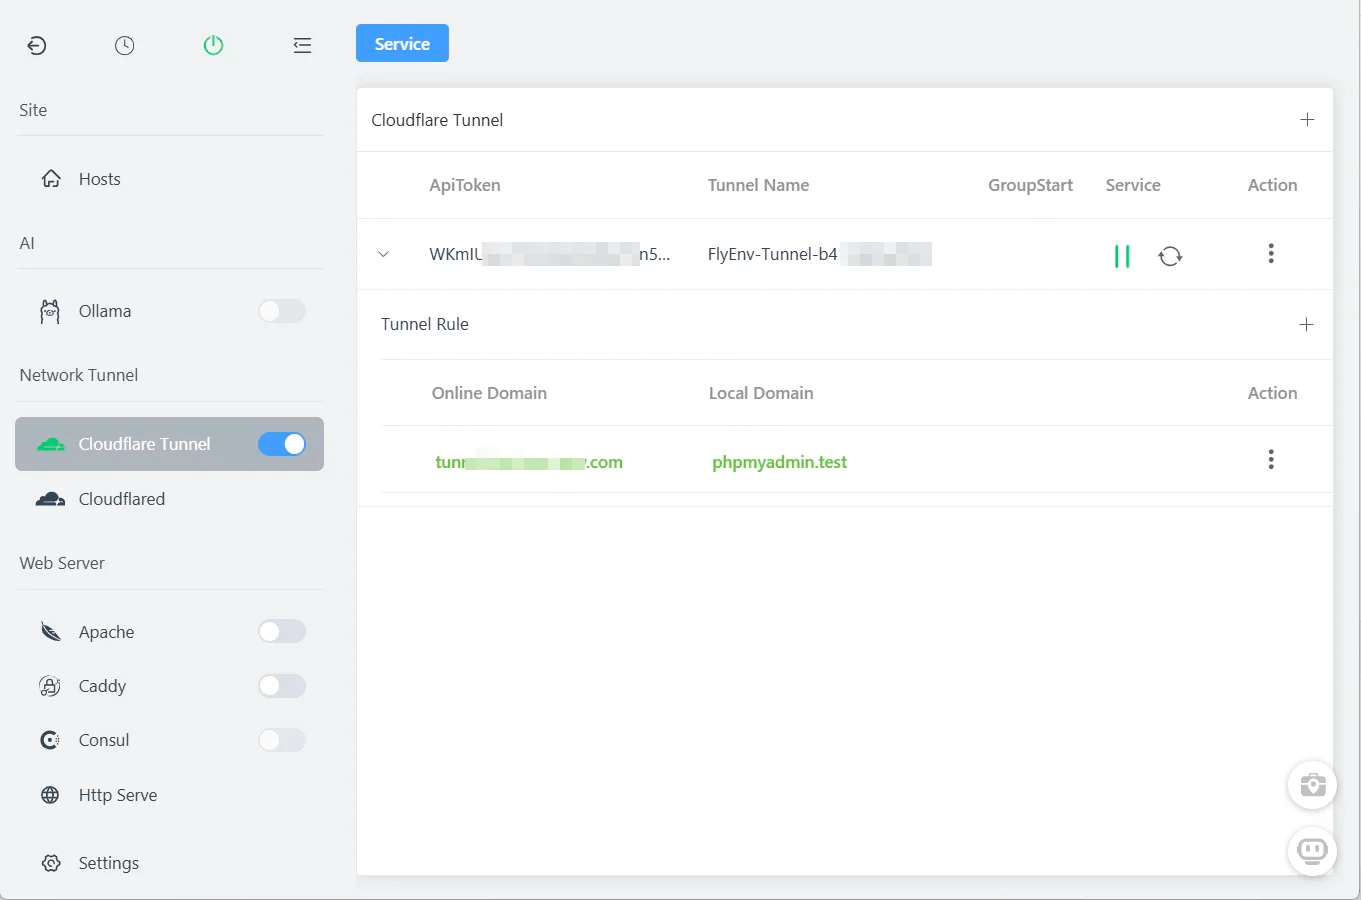
Managing Multiple Tunnels
Create as many tunnels as you need:
| Subdomain | Local URL | Purpose |
|---|---|---|
dev | https://myapp.test | Main development site |
api | http://localhost:3000 | API server |
admin | http://localhost:8080 | Admin dashboard |
client-a | https://client-a.test | Client preview |
All managed from one interface—start, stop, or delete tunnels with one click.
Manual Configuration (Command Line)
For advanced users who prefer command-line control, here's the traditional setup method:
Prerequisites
- A Cloudflare account (free tier works perfectly)
- A domain added to Cloudflare
- Cloudflared installed (available in FlyEnv's Cloudflared module)
Step 1: Authenticate with Cloudflare
cloudflared tunnel loginThis opens a browser window to authorize Cloudflare access.
Step 2: Create Your Tunnel
# Create a named tunnel
cloudflared tunnel create dev-localhost

# Output will show your Tunnel ID
# Save this - you'll need it for configuration
Step 3: Configure DNS Route
# Route your subdomain to the tunnel
cloudflared tunnel route dns dev-localhost dev.yourdomain.com
Step 4: Create Configuration File
Create config.yml:
tunnel: <your-tunnel-id>
credentials-file: /Users/username/.cloudflared/<tunnel-id>.json

ingress:
  - hostname: dev.yourdomain.com
    service: http://localhost:80
  - hostname: api.yourdomain.com
    service: http://localhost:3000
  - service: http_status:404
Step 5: Start the Tunnel
cloudflared tunnel run dev-localhostComparison: FlyEnv's UI approach eliminates all these steps—you just enter API token, select zone, set subdomain, and click save.
Common Use Cases
1. Client Previews
Before: "Let me deploy to staging... (30 minutes later)"
After: Share https://feature-branch.yourdomain.com instantly—just create a tunnel and start it.
2. Webhook Development
Testing Stripe, GitHub, or Slack webhooks locally:
FlyEnv Setup:
- Create tunnel:
webhooks.yourdomain.com→http://localhost:3000/webhooks - Start tunnel
- Configure webhook endpoint in Stripe/GitHub dashboard
3. Mobile Device Testing
Test responsive designs on actual devices:
- iPhone accesses
https://mobile.yourdomain.com - Android accesses same URL
- Both hit your local development server
4. API Development with HTTPS
Some APIs require HTTPS callbacks. Cloudflare Tunnel provides:
- Automatic SSL certificates
- HTTPS termination at Cloudflare's edge
- Secure connection to your localhost
5. Team Collaboration
Share work-in-progress with teammates:
- Each developer creates their own tunnel
- Or use one shared tunnel pointing to a team server
Troubleshooting
"Cannot get zones" in FlyEnv
Cause: Invalid API Token or insufficient permissions
Solution:
- Verify token has these permissions: Zone:Read, DNS:Edit, Cloudflare Tunnel:Edit
- Ensure token includes the zone you want to use
- Try creating a new token with the "Cloudflare Tunnel" template
"Tunnel creation failed"
Cause: Network issues or duplicate tunnel name
Solution:
- Check internet connection
- Try a different subdomain
- Check if tunnel already exists in Cloudflare dashboard
"Tunnel started but site not accessible"
Cause: Local URL incorrect or local service not running
Solution:
- Verify local URL in tunnel settings (e.g.,
http://localhost:3000) - Ensure your local development server is actually running
- Try accessing the local URL directly in browser first
DNS Not Propagating
Cause: Cloudflare DNS caching
Solution:
- Wait 1-5 minutes after creating tunnel
- Check DNS records in Cloudflare dashboard
- Ensure orange cloud is enabled (proxied)
Advanced Configuration
Authentication (Zero Trust)
Add Google/GitHub login to your tunnel:
- In Cloudflare Zero Trust Dashboard
- Go to Access → Applications
- Create new application for your subdomain
- Configure authentication providers
- Apply to your tunnel hostname
Now dev.yourdomain.com requires login before showing your local site.
Load Balancing (Multiple Tunnels)
For high-availability during demos:
# config.yml - Manual configuration example
# On Machine A
tunnel: tunnel-id-1
# On Machine B
tunnel: tunnel-id-2

# Both route to same hostname
# Cloudflare load balances between them
Note: For most development use cases, a single tunnel is sufficient.
Comparison: FlyEnv vs Manual Setup
| Aspect | Manual (Command Line) | FlyEnv UI |
|---|---|---|
| Setup time | 15-30 minutes | 2 minutes |
| Commands to remember | 10+ | 0 |
| Configuration files | Multiple YAML files | None |
| Tunnel management | Terminal commands | Point and click |
| Multiple tunnels | Complex | Easy |
| Start/stop | cloudflared tunnel run | One button |
Frequently Asked Questions (FAQ)
Q: Is Cloudflare Tunnel really free?
A: Yes. All features discussed—custom domains, unlimited bandwidth, authentication—are included in Cloudflare's free tier. FlyEnv's integration is also completely free.
Q: Do I need a paid Cloudflare plan?
A: No. The free Cloudflare plan works perfectly with tunnels.
Q: Can I use any domain?
A: You need to control the domain's DNS (add it to Cloudflare). Free domains work, or use a subdomain of a domain you own.
Q: How secure is this?
A: Very. The tunnel is outbound-only from your machine. Cloudflare's infrastructure handles DDoS protection, WAF, and SSL. Your local machine is never directly exposed.
Q: Will this slow down my local development?
A: Minimal impact. The tunnel adds ~50-100ms latency—acceptable for previews and webhooks. For local development, you still use localhost directly.
Q: What about WebSockets?
A: Fully supported through Cloudflare Tunnel. Real-time apps work perfectly.
Q: Can I use the same tunnel on multiple machines?
A: No—each tunnel is tied to one machine. Create separate tunnels for different machines or developers.
Q: What happens when I stop the tunnel?
A: The public URL becomes inaccessible, but DNS records remain. When you restart the tunnel (even days later), the same URL works again.
Q: Can I share tunnels with team members?
A: Team members can create their own tunnels pointing to their local machines. For shared environments, consider deploying to a staging server instead.
Q: Do I need to keep FlyEnv running?
A: Yes. The tunnel runs through FlyEnv's Cloudflare Tunnel module. Closing FlyEnv stops the tunnel.
Ready to Ditch ngrok?
Stop paying for basic tunneling features. Cloudflare Tunnel integrated with FlyEnv gives you enterprise-grade networking with one-click simplicity.
Download FlyEnv to get started with built-in Cloudflare Tunnel support.
Want to explore more networking features? Check out our guide on Reverse Proxy Setup or Custom Domains & Auto SSL.