Reverse Proxy Setup for NestJS, Node.js, Next.js: Nginx, Apache, Caddy Guide
Your Node.js app runs perfectly on localhost:3000. But how do you deploy it properly? Direct port access is insecure, managing PM2 plus firewall rules is painful, and Docker feels like overkill.
The solution: a reverse proxy. It handles SSL termination, load balancing, and clean URLs while your Node app focuses on business logic. This guide shows production-ready configurations for Nginx, Apache, and Caddy—all managed through FlyEnv's visual interface.
Why Use a Reverse Proxy?
Problems with Direct Port Access
# What developers often do (wrong)
http://yourserver.com:3000  # Exposes port, no SSL
Issues:
- Firewalls must open non-standard ports
- No SSL/TLS encryption
- No load balancing or failover
- Port conflicts between apps
- Ugly URLs for users
Reverse Proxy Benefits
# What you should do (right)
https://api.yourapp.com  ->  localhost:3000
https://app.yourapp.com  ->  localhost:3001
Advantages:
- ✅ Single port (80/443) for all apps
- ✅ Automatic SSL certificates
- ✅ Load balancing across multiple instances
- ✅ Clean domain-based routing
- ✅ Static file caching
- ✅ DDoS protection and rate limiting
Architecture Overview
User Request
     |
     v
[Cloudflare/Nginx/Apache/Caddy]  <-- Reverse Proxy (SSL, routing)
     |
     +---> Node.js App (port 3000)
     +---> PHP Site (port 80)
     +---> Static Files
     +---> Another Node App (port 3001)
FlyEnv One-Click Reverse Proxy Setup (Recommended)
FlyEnv provides a visual interface for configuring reverse proxies—no manual configuration file editing required. You can set up multiple reverse proxy rules for a single site with just a few clicks.
Setting Up Reverse Proxy in FlyEnv
- Open FlyEnv → Host module
- Select your site or create a new one
- Scroll to the "Reverse Proxy" section
- Click "Add" to create a new proxy rule
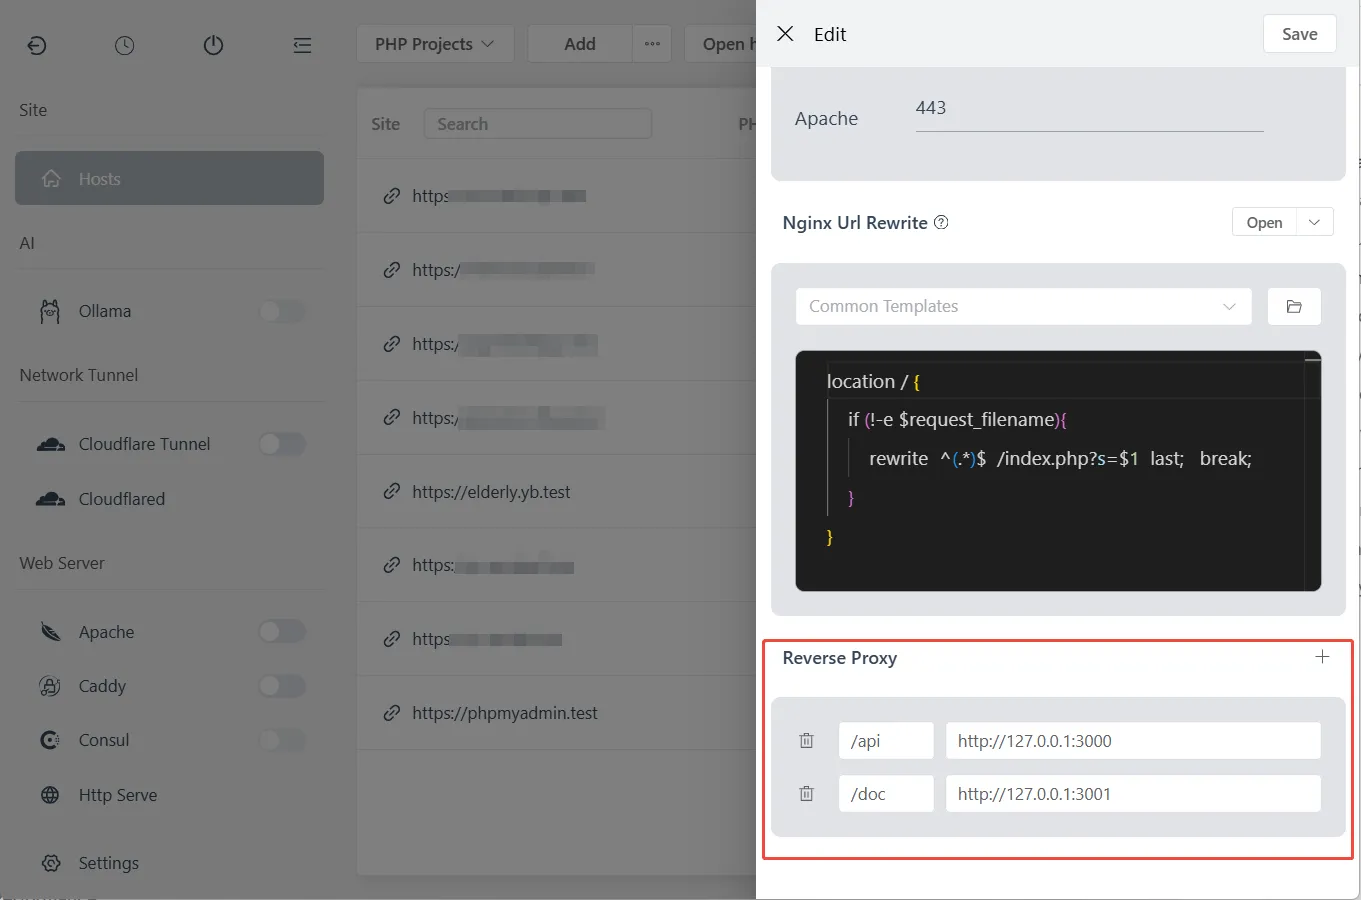
Configure Proxy Rules
For each reverse proxy rule, configure:
| Field | Description | Example |
|---|---|---|
| Match Path | URL path to match | /api or / |
| Target URL | Backend server address | http://127.0.0.1:3000 |
Example configurations:
| Use Case | Match Path | Target URL |
|---|---|---|
| API server | /api | http://127.0.0.1:3000 |
| WebSocket | /ws | http://127.0.0.1:3001 |
| Admin panel | /admin | http://127.0.0.1:8080 |
| Root proxy | / | http://127.0.0.1:3000 |
Multiple Proxy Rules
FlyEnv supports setting multiple reverse proxy rules for a single site. Rules are matched in order:
/api→http://127.0.0.1:3000(API requests)/admin→http://127.0.0.1:3001(Admin dashboard)/→http://127.0.0.1:3002(Main application)
Priority matters: More specific paths should come first. /api must be before /.
WebSocket Support
Enable WebSocket support for real-time applications:
- When adding/editing a proxy rule
- Check the "WebSocket" checkbox
- FlyEnv automatically configures upgrade headers
This is essential for Socket.io, GraphQL subscriptions, and other real-time features.
Behind the Scenes
When you save proxy rules in FlyEnv, it automatically:
- Generates proper Nginx/Apache/Caddy configuration
- Adds required headers (
X-Forwarded-For,X-Real-IP, etc.) - Configures WebSocket upgrade headers (if enabled)
- Reloads the web server to apply changes
No manual file editing or server restarts required.
Manual Configuration (Advanced)
For advanced use cases or custom requirements, you can manually edit configuration files. Below are the manual configurations for each web server.
Nginx Reverse Proxy Configuration
Basic NestJS/Node.js Proxy
Edit your site's Nginx vhost in FlyEnv:
server {
    listen 80;
    server_name api.yourdomain.test;

    location / {
        proxy_pass http://127.0.0.1:3000;
        proxy_http_version 1.1;
        proxy_set_header Upgrade $http_upgrade;
        proxy_set_header Connection 'upgrade';
        proxy_set_header Host $host;
        proxy_set_header X-Real-IP $remote_addr;
        proxy_set_header X-Forwarded-For $proxy_add_x_forwarded_for;
        proxy_set_header X-Forwarded-Proto $scheme;
        proxy_cache_bypass $http_upgrade;
        proxy_redirect off;
    }
}
Key headers explained:
Host: Original hostname for virtual hostingX-Real-IP: Client IP (for logging/rate limiting)X-Forwarded-*: Tells your app it's behind a proxy
WebSocket Support (Socket.io, etc.)
location / {
    proxy_pass http://127.0.0.1:3000;
    proxy_http_version 1.1;
    proxy_set_header Upgrade $http_upgrade;
    proxy_set_header Connection "upgrade";
    # ... other headers
}
The Upgrade and Connection headers enable WebSocket passthrough.
Static File Caching
Serve Next.js static files directly from Nginx:
# Cache static assets
location /_next/static {
    alias /path/to/your/app/.next/static;
    expires 365d;
    access_log off;
}

# Proxy everything else to Node.js
location / {
    proxy_pass http://127.0.0.1:3000;
    # ... headers
}
Multiple Apps on Same Domain
server {
    server_name yourdomain.test;

    # API -> NestJS
    location /api {
        proxy_pass http://127.0.0.1:3000;
        rewrite ^/api/(.*) /$1 break;
    }

    # Admin -> Express
    location /admin {
        proxy_pass http://127.0.0.1:3001;
        rewrite ^/admin/(.*) /$1 break;
    }

    # Main -> Next.js
    location / {
        proxy_pass http://127.0.0.1:3002;
    }
}
Apache Reverse Proxy Configuration
Enable Required Modules
In FlyEnv's Apache module, ensure these modules are enabled:
mod_proxymod_proxy_httpmod_proxy_wstunnel(for WebSockets)mod_rewrite(optional)
Basic Reverse Proxy
Edit Apache vhost configuration:
<VirtualHost *:80>
    ServerName api.yourdomain.test
    DocumentRoot "/var/www/html"

    ProxyPreserveHost On
    ProxyPass / http://127.0.0.1:3000/
    ProxyPassReverse / http://127.0.0.1:3000/

    # Headers
    RequestHeader set X-Real-IP %{REMOTE_ADDR}s
    RequestHeader set X-Forwarded-For %{REMOTE_ADDR}s
    RequestHeader set X-Forwarded-Proto "http"
</VirtualHost>
WebSocket Support
<VirtualHost *:80>
    ServerName ws.yourdomain.test

    # WebSocket proxy
    ProxyPass / ws://127.0.0.1:3000/
    ProxyPassReverse / ws://127.0.0.1:3000/

    # Required for Socket.io
    RewriteEngine on
    RewriteCond %{HTTP:Upgrade} websocket [NC]
    RewriteRule ^/?(.*) "ws://127.0.0.1:3000/$1" [P,L]
    RewriteCond %{HTTP:Upgrade} !=websocket [NC]
    RewriteRule ^/?(.*) "http://127.0.0.1:3000/$1" [P,L]
</VirtualHost>
Load Balancing (Multiple Node Instances)
<Proxy balancer://nodes>
    BalancerMember http://127.0.0.1:3000
    BalancerMember http://127.0.0.1:3001
    BalancerMember http://127.0.0.1:3002
</Proxy>

<VirtualHost *:80>
    ProxyPass / balancer://nodes/
    ProxyPassReverse / balancer://nodes/
</VirtualHost>
Caddy Reverse Proxy Configuration
Caddy simplifies reverse proxy configuration dramatically.
Basic Proxy (One Line!)
api.yourdomain.test {
    reverse_proxy localhost:3000
}
That's it. Caddy handles:
- HTTP/2 automatically
- WebSocket upgrades transparently
- Automatic HTTPS (with Let's Encrypt in production)
- Header forwarding
Multiple Services
# API service
api.yourdomain.test {
    reverse_proxy localhost:3000
}

# WebSocket service
ws.yourdomain.test {
    reverse_proxy localhost:3001
}

# Static site with API fallback
app.yourdomain.test {
    root * /var/www/app
    file_server

    # API calls go to Node.js
    handle_path /api/* {
        reverse_proxy localhost:3002
    }

    # SPA fallback
    try_files {path} {path}/ /index.html
}
Load Balancing
api.yourdomain.test {
    reverse_proxy localhost:3000 localhost:3001 localhost:3002 {
        lb_policy round_robin
        health_uri /health
        health_interval 30s
    }
}
Header Customization
api.yourdomain.test {
    reverse_proxy localhost:3000 {
        header_up Host {host}
        header_up X-Real-IP {remote}
        header_up X-Forwarded-For {remote}
        header_up X-Forwarded-Proto {scheme}

        # Custom header for your app
        header_up X-Proxy-Server "Caddy"
    }
}
Framework-Specific Considerations
NestJS
Trust proxy headers:
// main.ts
import { NestFactory } from '@nestjs/core';
import { AppModule } from './app.module';

async function bootstrap() {
  const app = await NestFactory.create(AppModule);

  // Trust proxy headers from Nginx/Apache/Caddy
  app.set('trust proxy', true);

  await app.listen(3000);
}
Global prefix for /api routes:
app.setGlobalPrefix('api');
// Now your routes are /api/users, not /users
Next.js
Custom server with proxy awareness:
// server.js
const { createServer } = require('http');
const { parse } = require('url');
const next = require('next');

const app = next({ dev: false });
const handle = app.getRequestHandler();

app.prepare().then(() => {
  createServer((req, res) => {
    const parsedUrl = parse(req.url, true);

    // Trust X-Forwarded-Proto for HTTPS detection
    if (req.headers['x-forwarded-proto'] === 'https') {
      req.isSecure = true;
    }

    handle(req, res, parsedUrl);
  }).listen(3000);
});
Express.js
const express = require('express');
const app = express();

// Trust proxy
app.set('trust proxy', true);

// Now req.ip shows real client IP, not proxy IP
app.get('/', (req, res) => {
  res.json({
    ip: req.ip,
    forwarded: req.headers['x-forwarded-for']
  });
});
Production Checklist
SSL/HTTPS Configuration
With FlyEnv Auto SSL:
- Enable SSL in Host settings
- Use HTTPS in proxy headers:
X-Forwarded-Proto https
Manual certificate:
# Nginx
listen 443 ssl;
ssl_certificate /path/to/cert.pem;
ssl_certificate_key /path/to/key.pem;
Process Management
Use PM2 to keep Node.js running:
# Install PM2
npm install -g pm2

# Start with PM2
pm2 start app.js --name "api-server"
pm2 startup
pm2 save
Health Checks
Add a simple health endpoint:
// NestJS
@Get('health')
health() {
  return { status: 'ok', timestamp: new Date() };
}

// Express
app.get('/health', (req, res) => {
  res.json({ status: 'ok' });
});
Configure proxy to check this endpoint for load balancing.
Troubleshooting
"Cannot GET /" errors
Cause: Path rewriting not configured
Solution:
# Remove /api prefix before proxying
rewrite ^/api/(.*) /$1 break;
WebSocket connection fails
Cause: Missing upgrade headers
Solution: Ensure both Upgrade and Connection headers are passed
"502 Bad Gateway"
Causes:
- Node.js app not running on specified port
- Firewall blocking localhost connection
- Wrong IP address in proxy_pass
Debug:
# Check if app is listening
netstat -tlnp | grep 3000

# Test direct connection
curl http://127.0.0.1:3000
Infinite redirect loops
Cause: Protocol detection issues
Solution: Ensure X-Forwarded-Proto is set and your app respects it
Client IP shows as 127.0.0.1
Cause: X-Forwarded-For header not passed or not trusted
Solution: Configure both proxy headers and app trust settings
Frequently Asked Questions (FAQ)
Q: Which reverse proxy is best?
A: For beginners, Caddy is easiest. For maximum compatibility, Nginx is the industry standard. Apache works well if you are already using it for PHP.
Q: Can I use multiple reverse proxies?
A: Yes. Common pattern: Cloudflare (edge) -> Nginx (server) -> Node.js (app).
Q: How do I scale to multiple servers?
A: Use a load balancer (AWS ALB, Nginx Plus, or HAProxy) distributing to multiple app servers.
Q: Should I use PM2 with reverse proxy?
A: Yes. PM2 handles process crashes; reverse proxy handles client connections. They complement each other.
Q: Can I proxy to remote servers?
A: Yes. Change 127.0.0.1 to any IP address. Useful for microservices architecture.
Q: How do I handle file uploads?
A: Increase client_max_body_size in Nginx or LimitRequestBody in Apache.
Summary Comparison
| Feature | Nginx | Apache | Caddy |
|---|---|---|---|
| Configuration | Moderate | Verbose | Simple |
| WebSocket support | Manual | Module-based | Automatic |
| Auto HTTPS | Certbot required | Certbot required | Built-in |
| Performance | Excellent | Good | Excellent |
| Learning curve | Medium | Medium | Low |
| PHP integration | FastCGI | mod_php | FastCGI |
Ready to set up your first reverse proxy? Start with FlyEnv's Host configuration to create your site, then apply the configurations above.
Need to expose your local development to the internet? Check out our Cloudflare Tunnel guide for secure public URLs.